|
At Full Wave Marine, we offer innovative products which will make your recreational sporting life more enjoyable, safe and most importantly EASY.
We are dedicated to either sourcing innovative high quality products or putting together our own innovative products specifically for for the recreational industry that either increase safety, make you life easy or make your life more enjoyable.
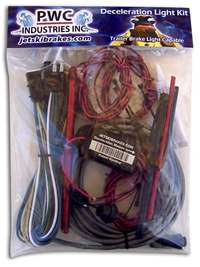
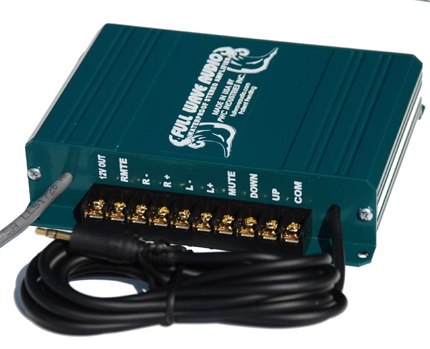
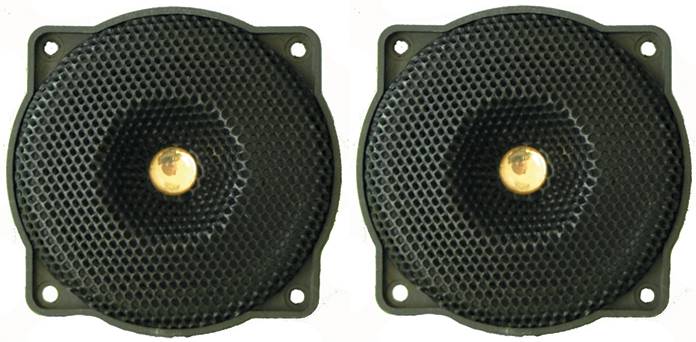
Full Wave Marine is the exclusive Australian Distributor for the Jet ski Brake Light Kits from PWC Industries and also the Waterproof Full Wave Audio kits designed for Personal Watercraft, Boats, All Terrain Vehicles and motorcycles.
We have also put together our own products which we have come up with from our own personal experiences. These products were generally products that we came up with to make our own lives easier as boaties/PWC'ers/4WD and camping enthusiasts.
There is lot of misconception and different views on how to maintain your PWC and we have a lot of idea's and some experience which we thought we would share with you on this topic.. As Yamaha FX HO owner's we have a few tips which we have put together to help you keep it running well. We are NOT Mechanics by trade - these tips are just from experience as owners of PWC's.
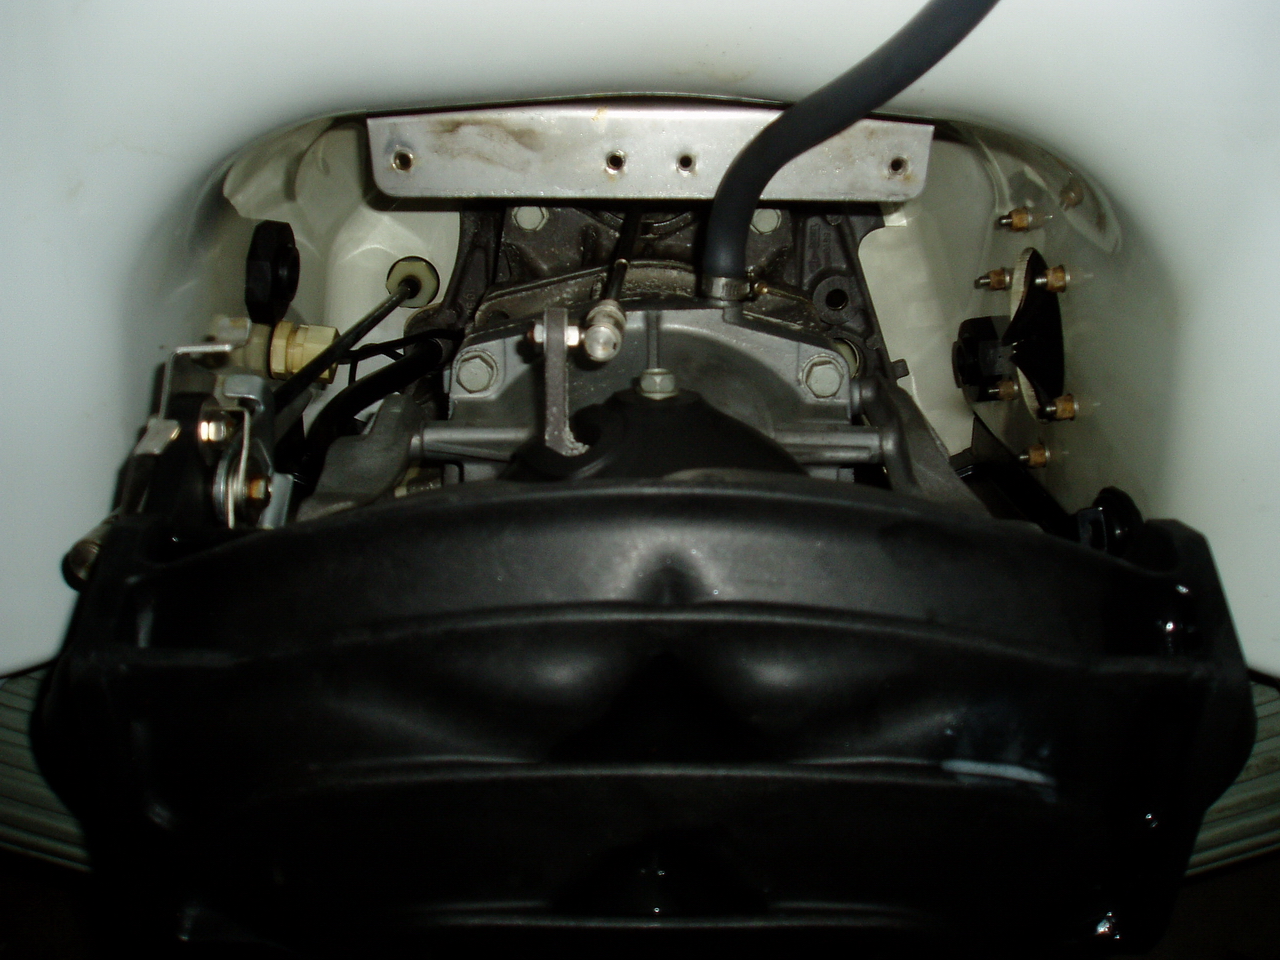
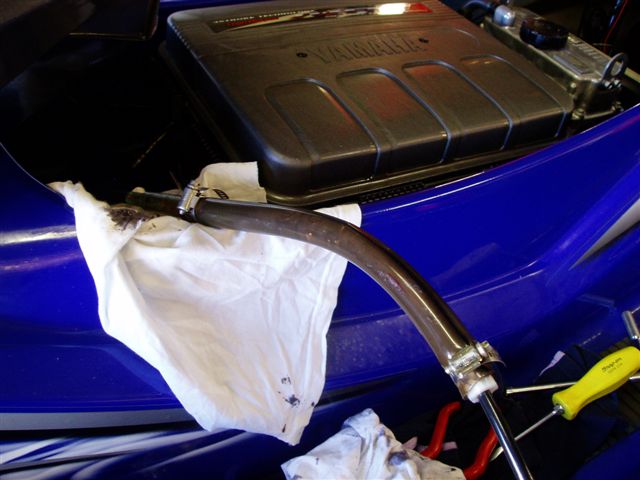
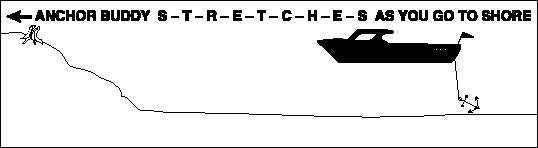
Recently, whilst installing my "Riva Free flow exhaust" I had to remove the right hand side rubber curtain to get access to the bolts holding the exhaust on the through hull fitting.
When I did this, I found sea weed and salt residue in there that I was not able to clean with a hose when doing my normal wash down.
It was suggested to me by a friend to remove both and leave them off as he does.
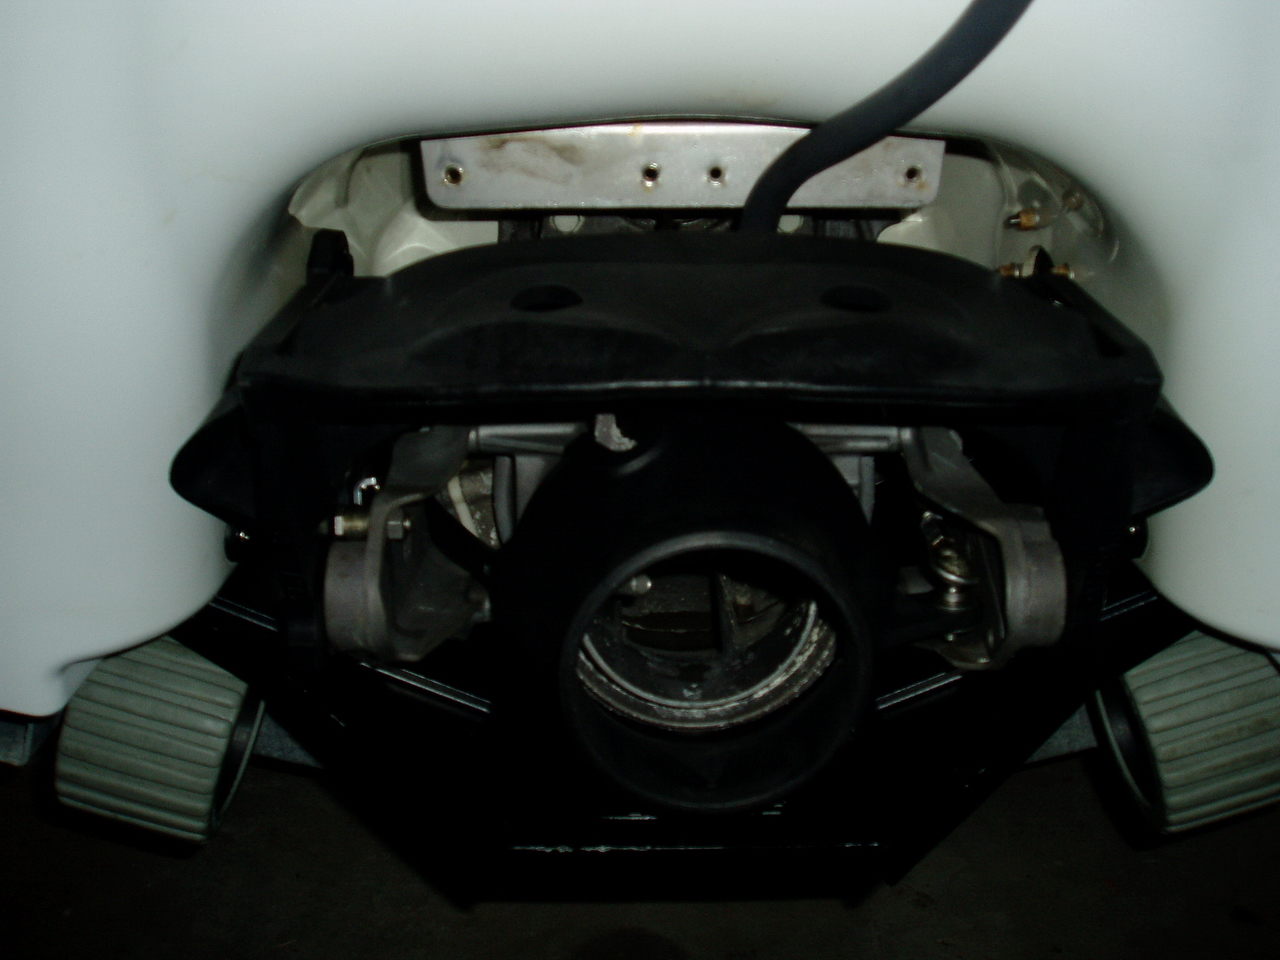
This has made cleaning and access in there much better and easier!
It also makes it slightly louder at slow speeds - not an offensive sound by any means - just a throatier sound at 6-12 knots. I actually like it!
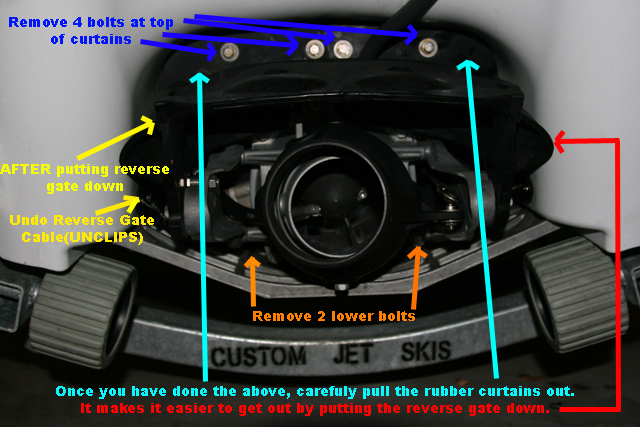
It is quite simple to do.
First remove the 4 stainless bolts(two per curtain) at the top of the curtains.
Second remove the two lower bolts on the curtains under the steering nozzle(one per curtain)
Third, lower the reverse gate and unclip the reverse gate cable on the left hand side looking at it from the rear.
Then carefully pull the curtains out.
Finally put the reverse gate cable back on.
Put the reverse gate back up.
All done! 
Now you can keep the area free of debris and salt etc.
Put the curtains in the cupboard and when you go to sell it, you will have nice fresh curtains to put back on for the new owner.
Photo's below with comments and before and after shots.
Thanks goes to my friend for giving me the advice to leave them off - one of the best things I have done for easy maintenance.
Frank
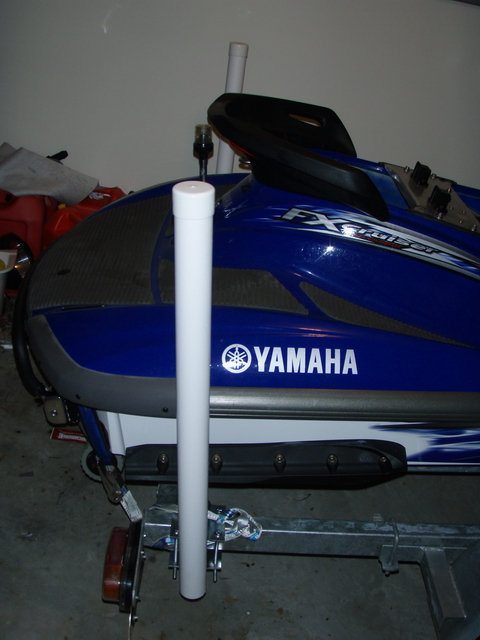
I own a Yamaha FX HO Cruiser which I tow on a single trailer behind a Toyota Landcruiser 4wd.
I found that when reversing down the boat ramp without the PWC on the trailer(when the PWC is still in the water waiting to be put back on the trailer), I had trouble seeing where the trailer was going because the trailer is not as wide as my vehicle and because of the vehicle's height, I couldn't see it over the tailgate when looking out the back window. I Found myself opening the door and hanging half my body out the side to see where I was pointing the trailer while reversing.
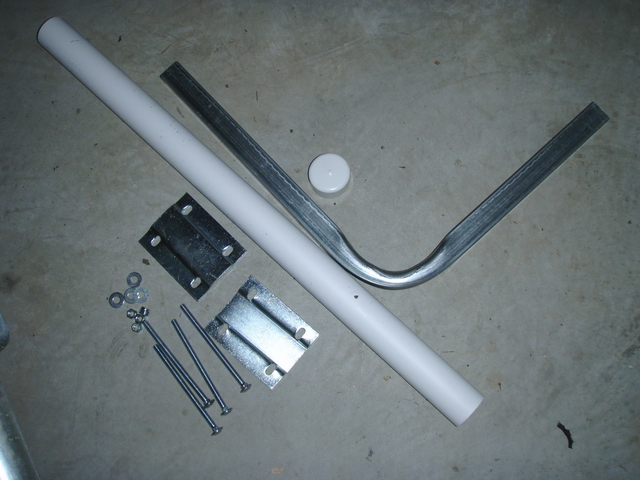
I decided to install some posts to help me see the trailer when it is on it's own without a PWC on it..
In the picture below, you will see what parts each one has.
It is basically an "L" shaped metal post which is bolted onto the each side of the rear of the trailer with a bracket and it has a PVC Pipe which slips over the top of it with a white CAP that goes on the top of the PVC pipe.
Took 10 minutes to install and now I can easily see my trailer when reversing the trailer without the PWC on the trailer - makes life real easy - thought I would share with everyone.
You could easily make them up yourself and save the money buying the already made version I bought if you have the workshop to do it.
Frank
I have an 05 FXHO with most of the RPM Kit installed with the exception of sponson, intake grate and PPK.
I decided to try something.
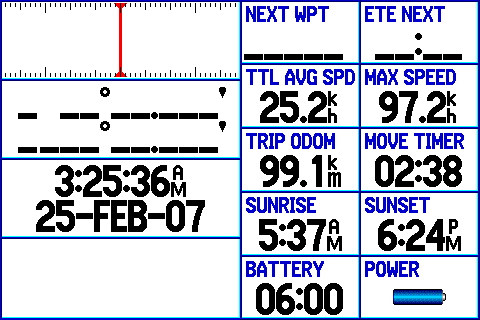
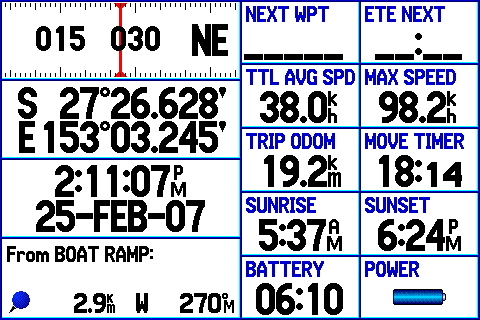
Filling in the 4 x Bolt holes of the Riva ride plate. I had heard that this made a reasonable difference in top speeds on GP's and thought I would give it a try on the FXHO Cruiser... had nothing to lose.
I did a speed run two ways using a GPS on the first day without the holes filled in. My top speed was 97.2 with an average of 96.8 both ways when I add up both speeds and divide by two.
The run on the second day with the 4 bolt holes filled in, gave me exactly 1 Kph higher top speeds when averaged the same way as the day before being an average of 97.8 Kph on the GPS.
So not a huge difference - but a consistent one.
The second day that I did the 1Kph increase in speed, I had another 20 liters of fuel on board so it is probably a little more gain that 1Kph.
I would say that it makes a bigger difference when you have a ski that gets into the 70+ MPH range.
GPS shots of top speed below and a not so good photo of a bolt hole filled with silicon to provide a smooth surface from ride plate across the hole.
NOTE: I suspect that when I need to undo the 4 bolts to remove the ride plate, it is going to be a pain cutting out the silicone. After I did it, I decided, I probably should have painted the top of the bolts with lanotec so that the silicon would be easy to remove... or put some tape over the bolts before filling the hole with silicone.
I am not worried, it will come out, with just a bit more mucking around when I have to do it, if I have to do it.
It's a simple thing to do with a small gain... It would be interesting to see if the same gains are had with the stock plate, I would imagine it would be the same...
Frank
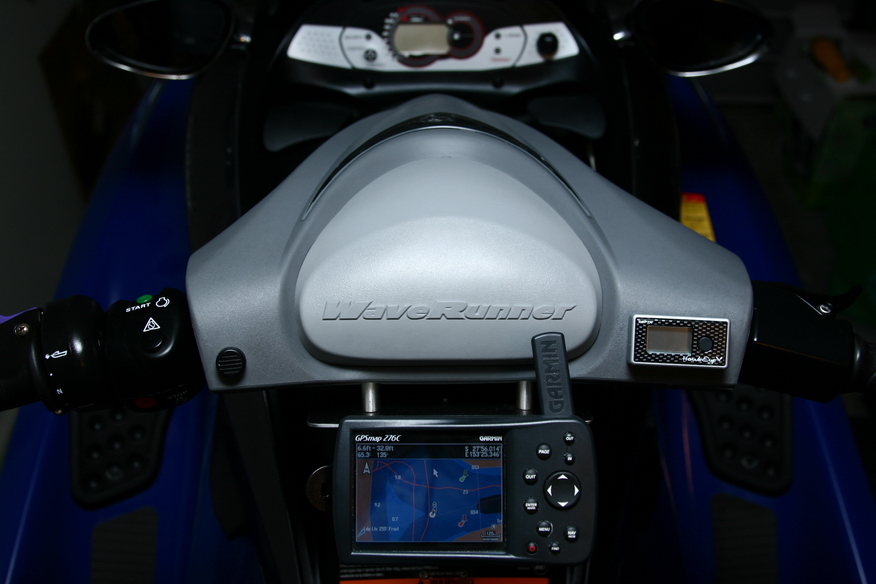
Thought I would share what I have done to mount my Garmin 276C Waterproof GPS to mount it on my cruiser.
I simply got a stainless steel plate, drilled the holes to match the ones holding the casing to the handlebars, used some spacers which gave me a mounting surface.
I then used a RAM Mount to mount it off that...
For me, it is very practical to use and easy to see.
See the pics attached.

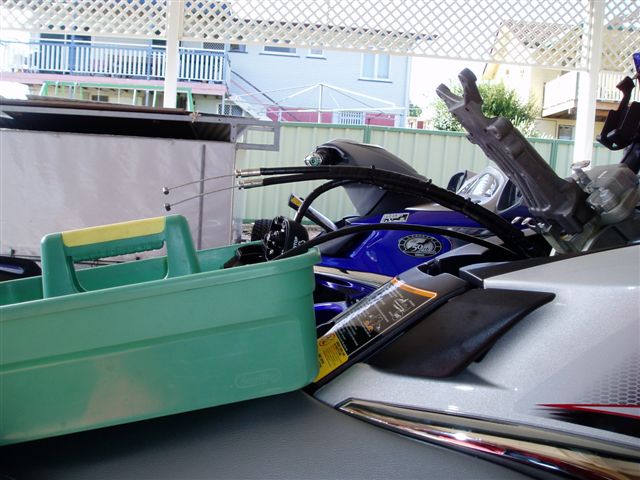
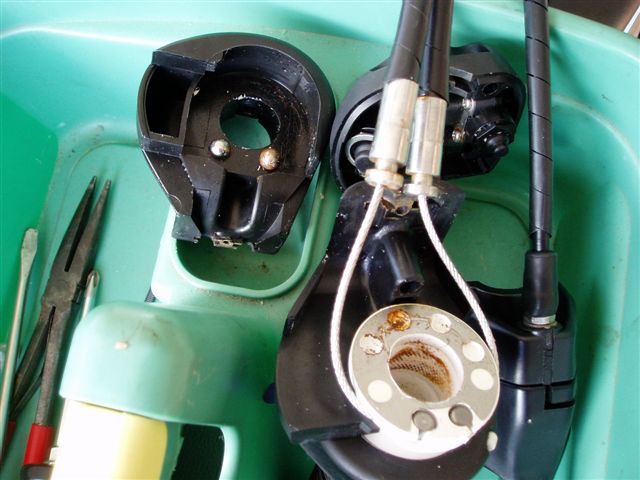
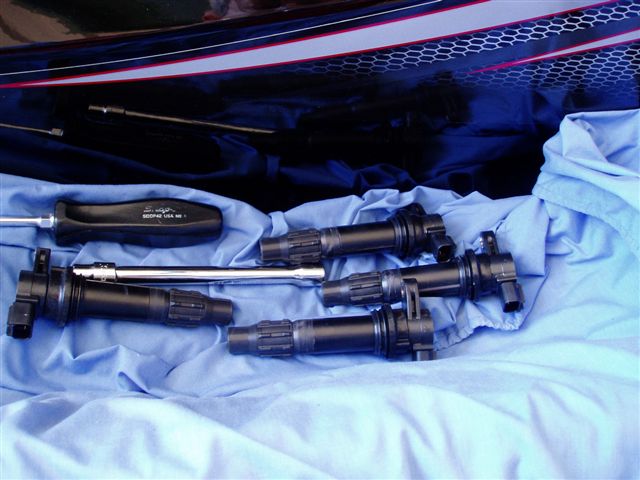
In the last three FXs I owned I've found the lubrication of the trim actuator and most of the cables leave a bit to be desired. It ranges from absolutely nothing to a token smear on the outside. This job AFAIK is a job done at the pre-delivery as the bars and trim are not on the ski.
In my experience they are ok with no lube at all for a period ..so don't panic. IMO it should be taken apart and inspected somewhere between 6 months and 1 year. The pics below are from my 06 Blackie and they were taken when I did the lube job on all the cables and trim at 5 months.
BE WARNED ... stripping the trim down and removing the cables assumes a certain standard of mechanical ability and if you remove the bars requires the use of a torque wrench for the assembly of the handlebar bosses. It is possible to do it without removing the bars by disassembling the units with the bars on.
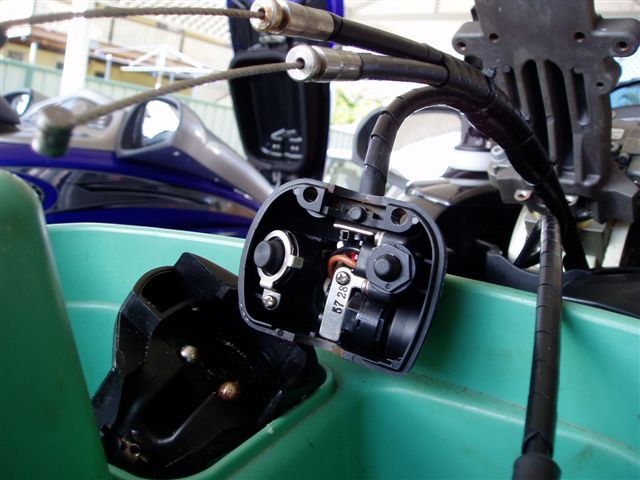
Below are some pics of the units as unassembled, no lube discovered and rust forming on the detent ball already ...
Inside the lanyard/start/stop switch its a good idea to spray a good marine lubricant in there before re-assembly ... good insurance.
Note how void of any lube the trim lever cable is ... and the rust starting in the ball detent !!
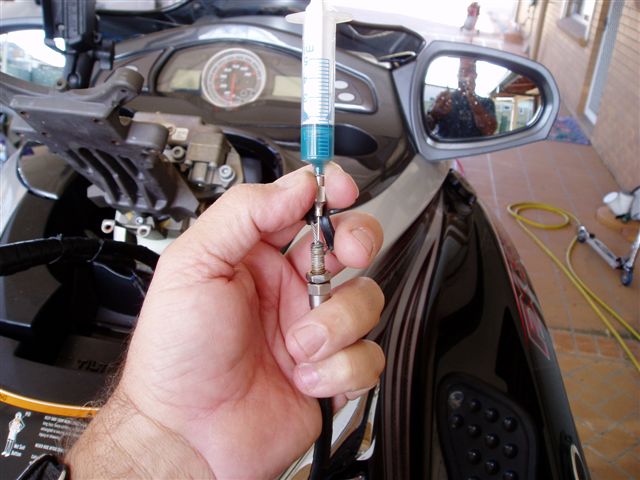
I use a mix for cable lubing. It consists of 1 part grease containing molly and 4 parts synthetic gearbox oil ... or even synth motor oil. My 05 had it done when only a week or two old and was still well lubed 140 hrs and 16 months later.
To push the mix down the cables I clamp a plastic line over the barrel and fill it with 10mls of lube and push it down with compressed air. After it disappears ...you may have to work the cable at the other end ... and it has not appeared at the other end add another 5ml and go again.
It is a bit of a pain to do but rewards you with cables lubed for an greatly extended period. I'd say in the realm of 18months to 2 yrs.
After lubing the Black 06 trim my wife noted her 50th was stiffer to shift ..so over the next month or two it will be done as well.
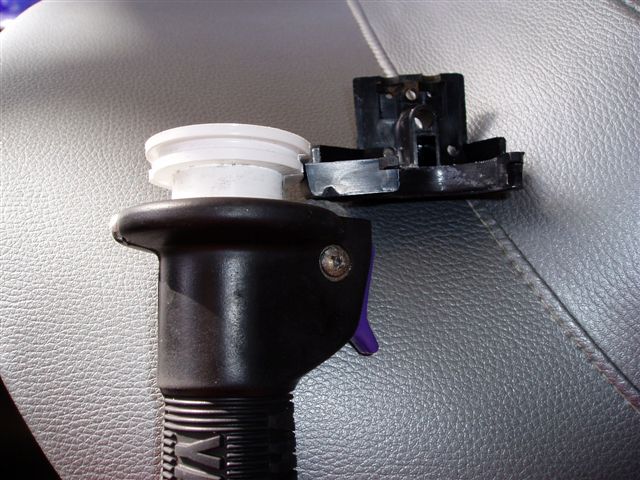
Pics below of some of the lubing ...with one showing how the trim cable tracks and balls should be lubed. I used Yamaha Marine Grease for that.
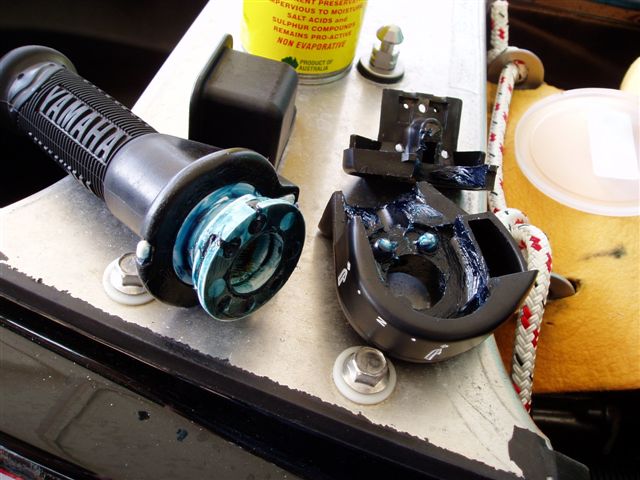
Even though the cable is not that flexible you can work it out to the side without too much trouble.
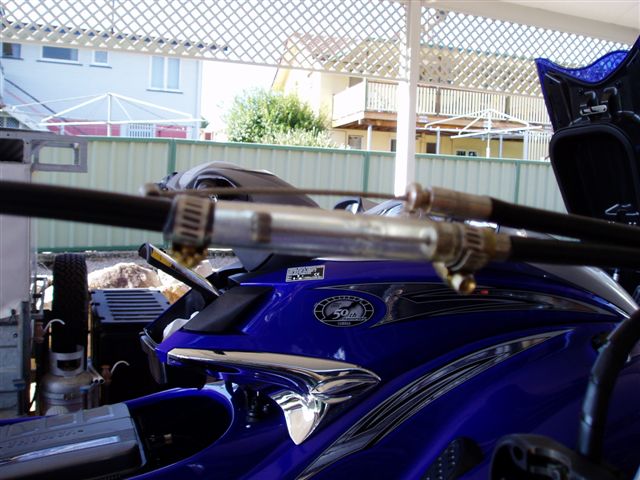
Don't remove the cable barrel that attaches it the the steering arm ball .... its loctited/locknutted and best left alone. Then remove the little black grommet that seals the inner and outer cable from water ingress. hold it away from its home with a small zip clip ... that's stops it going down and stopping lube from entering tube.
Place a large enough tube over so a ring-grip tightens down on the large diameter brass area of the cable mounting barrel.
Fill with a lube .... seal the end with a compressor barb or similar and hold vertical as you can ..and apply air gradually .... remove rubber grommet from rear ..
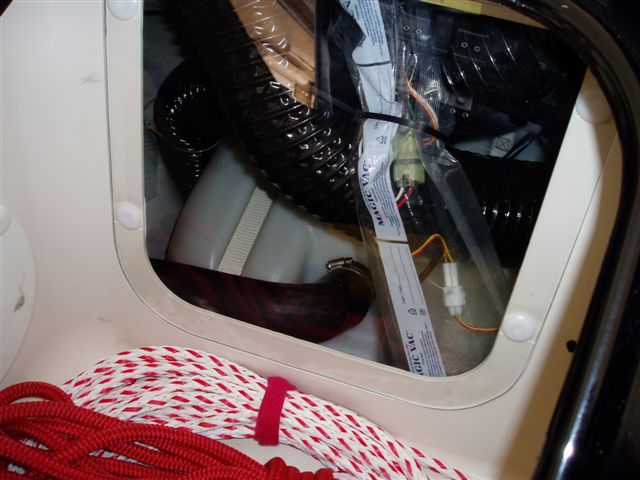
Every few rides I remove cargo panel and wash in front of tank and generally keep an eye on things. I decided to fabricate a see through panel from poly sheet in 1/8th and just keep an eye on salt crystals, tank hose and wiring loom, and when "necessary" remove and wash in front area.
Small piece was about $10 and took 1/2 hr to cut out with jigsaw and drill the 4 holes.
If you look from starboard side of ski into ski bottom through clear poly you can also see the remote locking receiver box and any salt marks on it.
Pics ...
The pin clips that hold the panel are a remove and refit almost forever.
To release them for removal, depress (push it in) the centre area of it that you can see ... its the bit in centre about 1/4 inch across. This allows the 3 barbs to come in so the clip can just be pulled out of the panel holes ..
To re-install ... push the centre pin from the rear side of the clip till the centre button on the front sits out about 3/16th .... place clip in holes and push centre pin back to flush ...all done ...
I've never found one (hose clamp) that is loose but you can also undo the fuel cap panel and just nip up the hose clamp on the fuel cap housing barb. Replace clips ...like above !
Some clip pics in their different positions .... might save one breaking ...
Pic 1 ... this is the "installed in craft" and locked, holding panel position ... button is flush with body ...
Pic 2 ... this is the pencil I use to depress the centre button for clip release.
Pic 3 ... this is the button depressed you can see how far in it goes ..its not far ...

Pic 4 ... this is the button pushed out to allow the clip to be placed in the panel holes ... when in holes press centre button to flush to lock the clip in position.
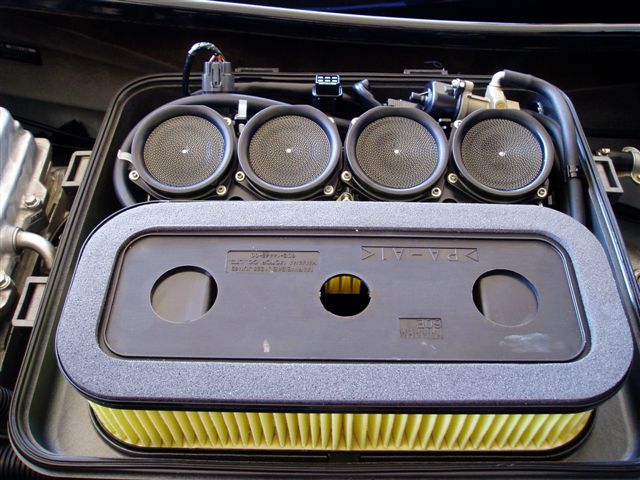
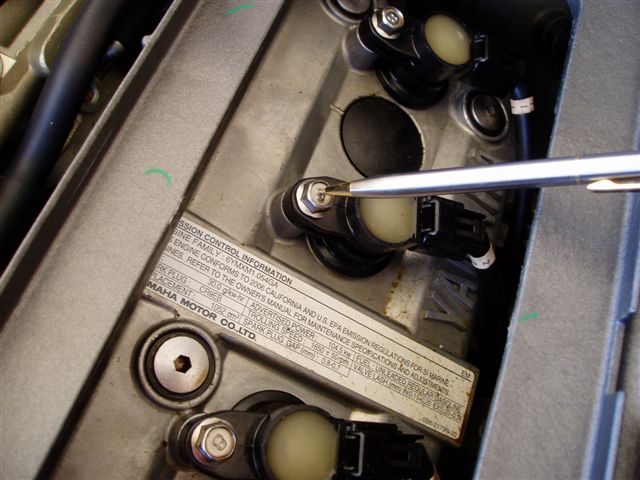
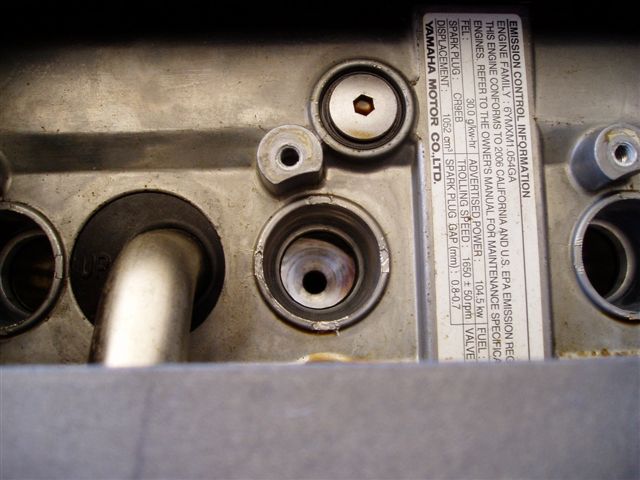
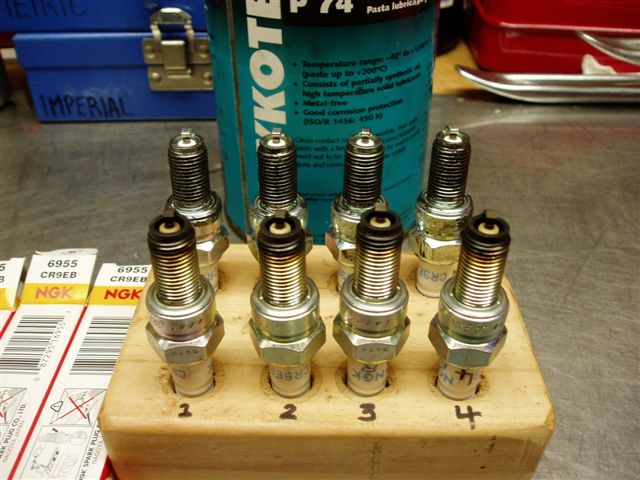
For the guys who want to change plugs in an FX and have never done it ... or for the person that just wants to see where they are just in case.
A few things ...
The plugs must have anti-seize on the threads before installation. This reduces the galvanic corrosion between the steel plug thread and the aluminum alloy head material. Plugs stay in 4 strokes much longer and don't have 2 stroke oil floating round the combustion chamber to capillary up the plug threads.
I've seen one FX that all 4 plugs snapped off in the head. The head had to be removed to drill out the plugs and helicoils were inserted. Bad news ! Expensive ! And totally preventable !!
Yamaha specifies the torque setting with the coating of anti-seize on the threads simply by saying to use anti-seize and then giving a torque setting. For this reason I suggest using a good torque wrench to nip them up ... especially as they are only a 10mm thread.
The torque setting is ... 13 Nm - 9.4 ft lbs - 113 inch/lbs.
The anti-seize MUST be aluminum compatible. I use MolyKote brand but just check its compatible with aluminum with the manufacturer.
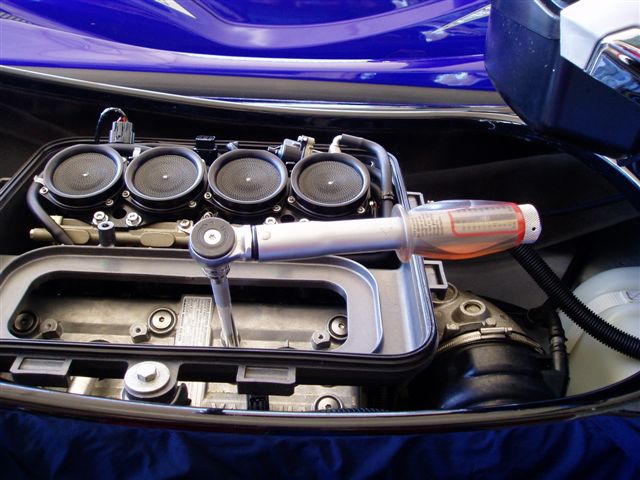
Remove the air filter box top by undoing the two centre screws and the 8 clips around the edge of the lid.
Remove the air filter.
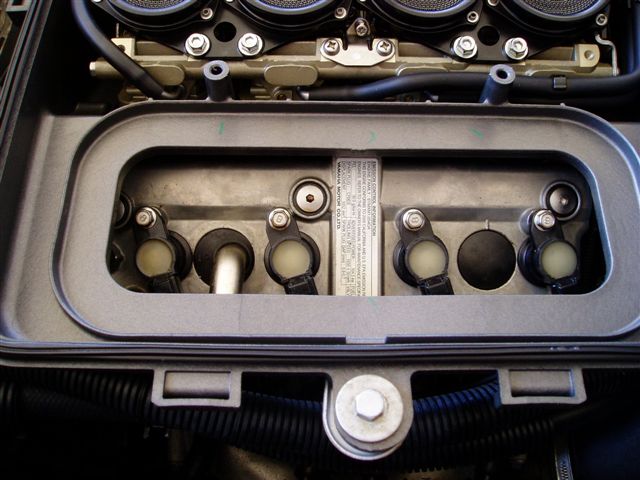
Next the coil plugs have to be removed. This involves compressing the tang of the plug on the coil (see pic). Depress gently and pull away from coil with fingers and plug should come off relatively easy if it doesn't don't pull hard ..depress tang slightly further.
Tang is shown in Pic 4 by the pen ! In Pic 3 you can see the coil plugs and the white collar that has the cylinder number on it.
The plugs are numbered 1 through 4 they must go back the same way i.e. Coil 1 (front cylinder) gets plug No 1 etc ... to 4th cylinder.
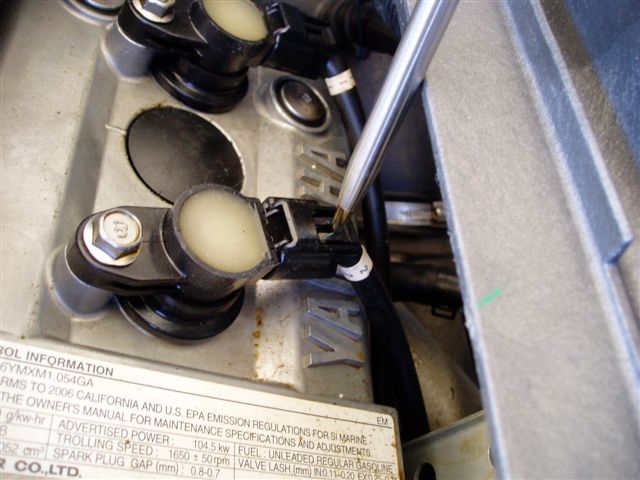
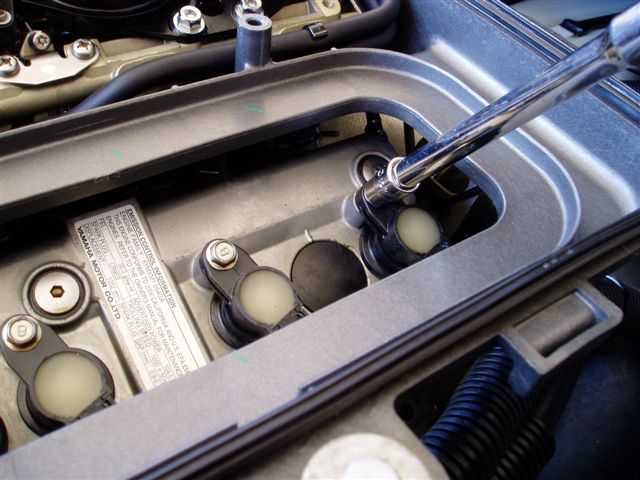
Next undo the coil bolt (10mm socket) This bolt has a locking compound on it called Loctite 572. I clean the coil bolts with acetone and a small brass brush and reapply the 572.
The torque setting for the coil attaching bolt is 7.6Nm - 5.5 ft/lbs - 66 inch/lbs.
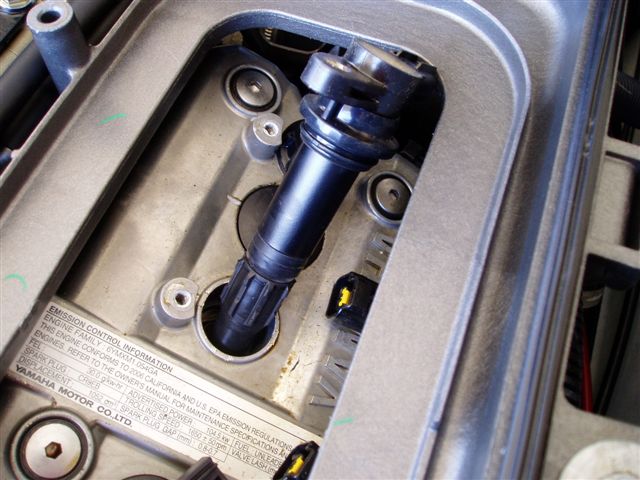
Once undone you have to remove coils. Be gentle with them they are expensive. The coil has a rubber surround and grips the plug bores quite well. The way to get it out is to turn the coil in the plug bore anti-clockwise and then clockwise 1/8 th turn at a time while you lift it up. It will come up slowly ... and then out.
We can now finally see the plugs !!! (smile)
 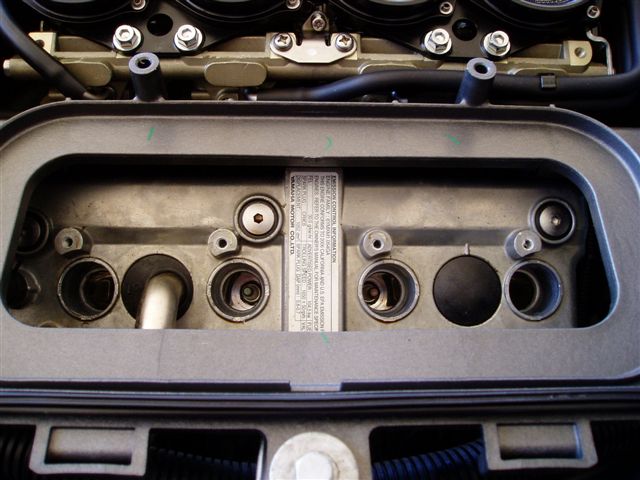
Next we have to make sure the plug bore has no crap in it ! Sometimes some tiny rubber bits from coil might be present. After plugs are removed I vacuum plug bore again to remove any matter from plug if some fell off. Usually doesn't but it doesn't hurt to NOT have anything go into cylinder !!
I use a household vacuum cleaner that I tape a small piece of hose into the end. The one in the pic has two hose sizes for getting into smaller/larger areas. I keep it on the shelf and use it for various things. Start vacuum cleaner and insert hose down plug bore for a good suck out !!! Clean as then ... see plug bores in last pic !
The plug spanner has to grip the plug because the bore is quite deep (5 inches or so) and you need an extension that is long enough as well. I use a Snap-On magnetic plug socket it grips the plug well ...traditionally a rubber boot type is used. Either is fine ... I do love my Snap-on though !!
Pics ....
Next remove plugs ...
As I said remove plugs and vacuum again if necessary.
I have inserted a pic of plugs on bench. The foreground ones are the ones I changed ... they have done 50 hrs and look great. The rear 4 are new ones, gap checked and anti-seize coated ready to install.
Last pic is torqueing the plug. I torque it up ... undo and re-torque slowly tile set and that's it !!
Plug gap is .028-.031 inch.
Coils go back in by reversing removal method. Pics of coils bolts dirty then with new 572 on them and a torque up of coil bolts.
Plugs go back on coils ... in order please ... air filter then cover ! Don't over tighten the air filter box cover screws just firm is the go ... depress the lid with your hand (slightly) near the bolts as they nip up !!
Plugs should be done every 100 hrs or annually and that's fine ... I do it 50 or six months just to remove and refit to keep threads lubed up.
The oil should be at or near operating temp for the change as you know. It takes a bit longer to warm up than most think. 15 minutes on the hose is about the minimum, even Yamaha recommend 11 minutes or more if the ambient temp is below 68 deg F.
I use Yamalube 4 stroke oil 10w-30 in my MR-1 engines until about 75-100 hrs then change over to Amsoil Formula Marine 4 stroke oil 10w-30 (fully synthetic). 50 motor hours or annually is fine but I prefer 50 hrs or six months.
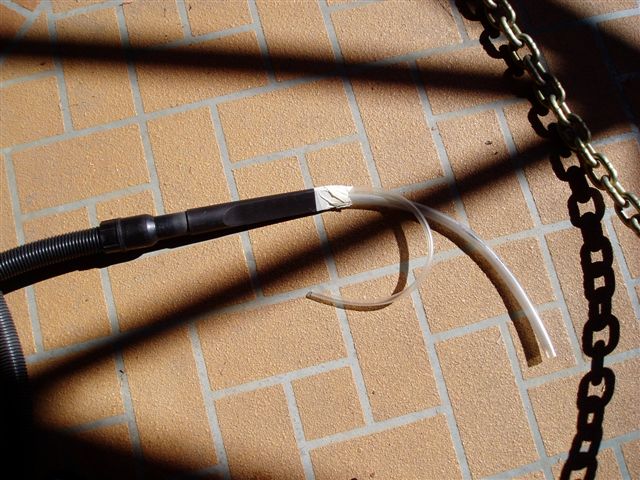
I use a cut down ice-cream container to go under the filter to catch the oil when removing it. I then slide it forward and up near motor fuel line entry to remove it. Another way is to use a disposable diaper under the area or just old rags.
I use a torque wrench with a filter socket attached to do the filter up (12 ft lbs) smear a slight film of oil over the O ring on the filter.
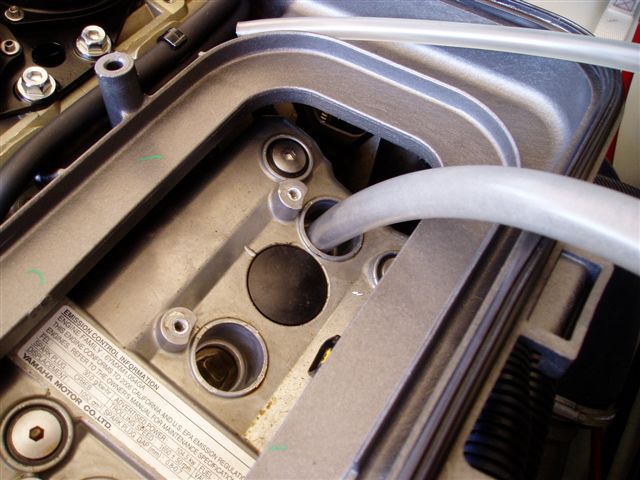
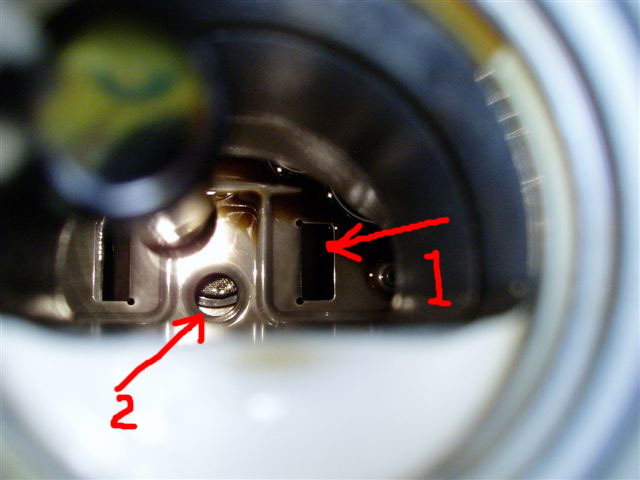
When sucking the oil out of the oil tank have the craft level. There is a baffle plate in the bottom of the oil tank that has a small louvre in it (two of) my vacuum bottle tube passes through this to the tanks real bottom. Try to pass the tube through if you can ... BE CAREFUL THOUGH ... the louvre has a sharp angled edge facing down. If the tube is forced through it will catch on the sharp edge and be hard to get back out. Pic below of oil tank inside ....
If the tube doesn't pass through the louvre (number 1 in pic) ,might be safer to do this anyway, use the round hole area in pic (number 2 in pic) above the oil tank filter screen to suck oil from ....
I usually get 2.5 quarts out in the vacuum bottle. The mixing of the oils at type or brand change time should be ok. I checked with Amsoil about mixing the Formula Marine with Yamalube and they said the oil is fully compatible with Mineral Oils. I will do next change at 25 hrs to give a Yamalube % of only 25 in the Amsoil ..then again at 50 for 12.5 % dilution.
Replace what you get out by volume or weight and warm engine up again on hose to check level. I like to run the level half way between the add and full marks on the dipstick.
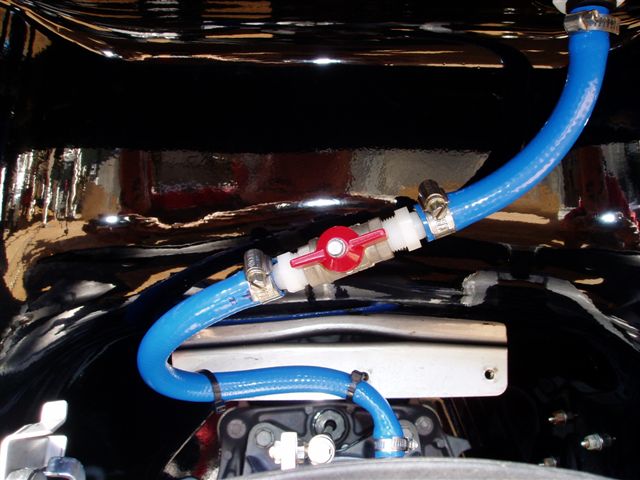
If you read in your manual it states that you cant tow your ski over 5 mph or engine damage may result (flooding the cylinders via the exhaust ports).
The tow tap (tow-valve) solves this issue and is mainly done to allow people to tow their pwcs behind boats at speed (above 5 mph).
All skis as far as I'm aware use the pump water flow downstream of the impeller ,where the water is pressurised, to flow water through the cooling system.
That is ... they don't have a water pump per se they just bleed pressurised water off the main pump.
Because the water intake of the ski is far greater in size than the pump nozzle outlet it builds pressure by being towed. That is ..water starts to flow through the pump when towed and has a smaller outlet than inlet so builds pressure.
Water starts to flow through the cooling system now ... if this pressure gets high enough it will overcome the gravity of the exhaust port height. Water pushes ever more upward including the water cooled exhaust passages ...which lead to the exhaust port with an open exhaust valve which leads to the particular cylinder that has has the open valve ... and the cylinder fills with water.
A tow tap goes in the main feed line from the pump to the motor and you close it to tow the craft and keep it safe from "tow flooding" the engine cylinders via the exhaust cooling passages.
Check your owner's manual to see if you can tow at speed with the Kawis .. I don't think you can but check anyway ... Yamaha don't recommend towing over 5mph for this reason.
Even the closed loop cooling system of the Seadoo Runabouts don't keep them safe from this flooding as they run an open loop cooling through the exhaust.
You wont sink them .... but you may flood the engine cylinders with water !
Its kind of like running it on the hose with the engine off ... water is going up the cooling lines with engine off when you tow it ....
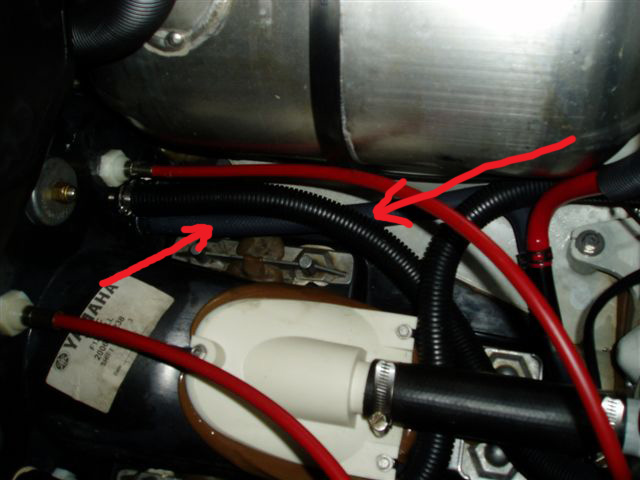
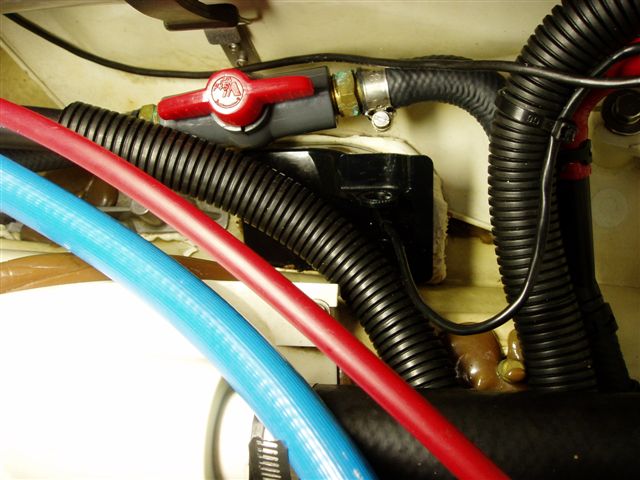
Below are pics of where the tow tap goes ! Be careful when sizing it and the barbs for the valve. The diameter of the valve and barbs should be below .490 inch.
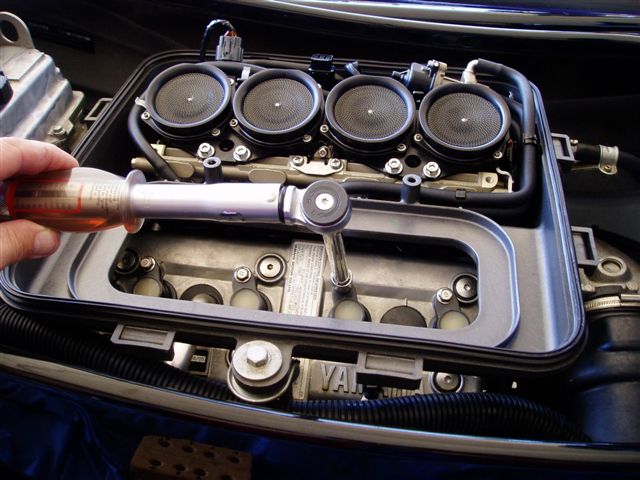
I can offer what I did for my skis when it came time to grease I/housing.
I did it in grams as its far more accurate a measure as there are 28grams in an ounce (close enough).
The manual calls for between 31 and 33 grams at 10 hrs and 6-7.5 grams thereafter (100 hrs).
Grease, for all intents and purposes, is not compressible. So a good quality grease gun, that has good seals, and for every FULL stroke of the handle it puts out a certain volume/weight of grease... called stroke volume.
I grabbed a very accurate set of scales (to .1 of a gram) and measured the stroke volume of my good grease gun filled with the recommended Yamaha Grease.
The volume came out as almost spot on 1 gram per stroke. To prove it even further I pumped 10 pumps onto scales for 10.5 grams.
I then proceeded to pump 31 pumps into the Intermediate Housing nipple. I have removed the tube on previous late models (1x05FXHO and 2x06FXHO) and found it takes about 1/3rd of the total grease at 10 hr amount just to fill the rubber tube. It DOES not come with any grease in the tube from factory... but the bearing is prelubed to cover lubrication up to the 10hrs. The rest of the grease amount takes up the bearing/seal space and provides the right amount of lube for the bearing rollers/races.
This is my third FXHO I've owned and greased this way. The 05 got 7 pumps at 100hrs ...it was traded at 140 hrs.
Looking at the drawings it seems that the seal lips face the way to let grease go passed without dislodging the seals BUT .... as a precaution I pumped the grease in very slowly ... a count of about 7-8 seconds per stroke.
This makes ya hand bloody tired But is the only way to accurately place the specified amount in by spec'd by Yamaha... and with virtually no chance of seal movement IMHO.
I've seen some dealers give a token "coupla pumps mate" she'll be right, ..it takes 7-10 odd just to fill the rubber tube.
I've seen a few GPs (mates) come back from 10 hr service and there is a grease smear at the nipple .... we pull tube off at housing end and no grease for ages up the tube !!!
There must be so many skis round with no grease in the bearings for ages and they don't seem to fail ?? Maybe that's a testament to the factory bearing and bearing makers installed grease in it.
They turn quite fast at 7000 ....
|
 .
.
